本章节所有代码托管在miniOS_32
章节任务介绍
任务简介
上一节,我们初步完成了内核的内存管理部分的内容
本节我们将正式开始操作系统进程管理的相关内容
本节的主要任务有:
- 创建并初始化PCB
- 模拟pthread_create函数创建线程并执行线程函数
任务目标
 1
 2
 3
 4
 5
 6
 7
 8
 9
10
11
12
13
14
15
|
#include<pthread.h>
#include<stdio.h>

void* thread_work(void* args){
    char* str=(char*)args;
    printf("args is %s\n",str);
    return NULL;
}

int main(){
    pthread_t tid;
    pthread_create(&tid,NULL,thread_work,"pthread_create\n");
    pthread_join(tid,NULL);
    return 0;
}
|
本节我们将实现一个类似于pthread_create的函数,用于创建一个线程并执行传入的执行函数,最终实现的调用代码如下所示
/kernel/main.c
 1
 2
 3
 4
 5
 6
 7
 8
 9
10
11
12
13
14
15
16
17
18
19
20
21
22
23
24
25
|
#include "print.h"
#include "init.h"
#include "thread.h"
void thread_work(void *arg);

int main(void)
{
    put_str("I am kernel\n");
    init_all();

    thread_start("thread_work", 31, thread_work, "pthread_create\n");

    while (1);
    return 0;
}

/* 线程执行函数 */
void thread_work(void *arg)
{
    char *para = (char *)arg;

    int i = 10;
    while (i--)
        put_str(para);
}
|
PCB简介
如同上一节中的位图,位图是管理内存的数据结构,对于线程或者进程,也需要有一个数据结构对其进行管理,这个数据结构就是PCB。
PCB(Process Control Block,进程控制块)是操作系统内部用于存储进程信息的数据结构。
操作系统通过PCB来管理和调度进程。
PCB 的生命周期:
- 进程创建时:每当操作系统创建一个新的进程时,系统会为该进程分配一个PCB,初始化进程的各种信息;
- 进程执行时:进程在运行时,操作系统通过 PCB 来管理和调度进程。每当进程状态发生变化(如从就绪变为运行,或从运行变为阻塞),操作系统会更新 PCB;
- 进程终止时:当进程执行完毕或被终止时,操作系统会回收该进程的 PCB,并释放相关资源。
PCB的内容:
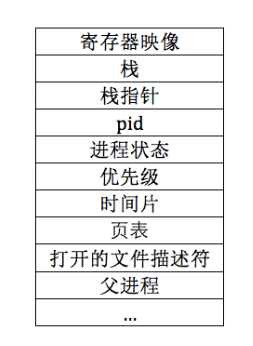
PCB中包含了进程执行所需的各种信息,如进程状态、寄存器值、内存使用情况、I/O 状态等。
PCB 的主要功能:
- 进程管理:每个进程都有一个唯一的 PCB,操作系统通过它来追踪进程的状态、资源等信息。
- 上下文切换:当操作系统切换执行进程时,它会保存当前进程的 PCB,并加载下一个进程的 PCB,从而实现进程的上下文切换。
- 进程调度:操作系统通过PCB来选择下一个运行的进程。调度器根据进程的状态、优先级等信息做出决策。
以下是PCB的示意结构图
在内核空间中创建并运行线程
代码目录结构
 1
 2
 3
 4
 5
 6
 7
 8
 9
10
11
12
13
14
15
16
17
18
19
20
21
22
23
24
25
26
27
28
29
30
31
32
33
34
35
36
37
38
39
40
41
42
43
44
45
46
47
|
.
├── bin
│   ├── bitmap.o
│   ├── debug.o
│   ├── init.o
│   ├── interrupt.o
│   ├── kernel.bin
│   ├── kernel.o
│   ├── loader
│   ├── main.o
│   ├── mbr
│   ├── memory.o
│   ├── print.o
│   ├── string.o
│   └── thread.o
├── boot
│   ├── include
│   │   └── boot.inc
│   ├── loader.S
│   └── mbr.S
├── kernel
│   ├── debug.c
│   ├── debug.h
│   ├── global.h
│   ├── init.c
│   ├── init.h
│   ├── interrupt.c
│   ├── interrupt.h
│   ├── kernel.S
│   ├── main.c
│   ├── memory.c
│   └── memory.h
├── lib
│   ├── kernel
│   │   ├── bitmap.c
│   │   ├── bitmap.h
│   │   ├── io.h
│   │   ├── print.h
│   │   └── print.S
│   ├── stdint.h
│   ├── string.c
│   └── string.h
├── Makefile
├── start.sh
└── thread
    ├── thread.c
    └── thread.h
|
数据结构定义
/thread/thread.h
定义进程或者线程的任务状态
 1
 2
 3
 4
 5
 6
 7
 8
 9
10
|
/*定义进程或者线程的任务状态*/
enum task_status
{
    TASK_RUNNGING,
    TASK_READY,
    TASK_BLOCKED,
    TASK_WAITING,
    TASK_HANGING,
    TASK_DIED,
};
|
定义线程栈,存储线程执行时的运行信息
 1
 2
 3
 4
 5
 6
 7
 8
 9
10
11
12
13
14
15
16
17
|
/*定义线程栈,存储线程执行时的运行信息*/
struct thread_stack
{
    uint32_t ebp;
    uint32_t ebx;
    uint32_t edi;
    uint32_t esi;

    // 一个函数指针,指向线程执行函数,目的是为了实现通用的线程函数调用
    void (*eip)(thread_func *func, void *func_args);
    // 以下三条是模仿call进入thread_start执行的栈内布局构建的,call进入就会压入参数与返回地址,因为我们是ret进入kernel_thread执行的
    // 要想让kernel_thread正常执行,就必须人为给它造返回地址,参数
    void(*unused_retaddr); // 一个栈结构占位
    thread_func *function;
    void *func_args;
};
|
定义PCB,PCB的信息庞大复杂,我们将来一点点对其进行填充,本节只需要以下信息即可
 1
 2
 3
 4
 5
 6
 7
 8
 9
10
11
12
13
14
|
/*PCB结构体*/
struct task_struct
{
    // 线程栈的栈顶指针
    uint32_t *self_kstack;
    // 线程状态
    enum task_status status;
    // 线程的优先级
    uint8_t priority;
    // 线程函数名
    char name[16];
    // 用于PCB结构体的边界标记
    uint32_t stack_magic;
};
|
代码讲解
代码逻辑
- 向内存申请一页空间,分配给要创建的线程
- 初始化该线程的PCB
- 通过PCB中的栈顶指针进一步初始化线程栈的运行信息
- 正式运行线程执行函数
如下所示,thread_start就是我们最终要实现的用以模拟pthread_create的函数
其包含了我们上述说的代码逻辑
 1
 2
 3
 4
 5
 6
 7
 8
 9
10
11
12
13
14
15
16
17
18
19
20
21
22
23
24
25
|
/*根据线程栈的运行信息开始运行线程函数*/
struct task_struct *thread_start(char *name, int prio, thread_func function, void *func_args)
{
    /*1.分配一页空间给线程作为线程执行的栈空间*/
    struct task_struct *thread = get_kernel_pages(1);
    /*2.初始化PCB,PCB里存放了线程的基本信息以及线程栈的栈顶指针*/
    init_thread(thread, name, prio);
    /*
    3.根据线程栈的栈顶指针,初始化线程栈,也就是初始化线程的运行信息
    比如线程要执行的函数,以及函数参数
    */
    thread_create(thread, function, func_args);
    /*4.上述准备好线程运行时的栈信息后,即可运行执行函数了*/
    asm volatile("movl %0,%%esp;    \
                pop %%ebp;          \
                pop %%ebx;          \
                pop %%edi;          \
                pop %%esi;          \
                ret"
                 :
                 : "g"(thread->self_kstack)
                 : "memory");
    return thread;
}
|
关于最后执行运行函数的内联汇编代码,主要与线程栈的栈空间布局有关,我们在最后初始化栈空间的运行信息之后进行详细说明
初始化PCB
 1
 2
 3
 4
 5
 6
 7
 8
 9
10
11
12
13
14
|
/*PCB结构体*/
struct task_struct
{
    // 线程栈的栈顶指针
    uint32_t *self_kstack;
    // 线程状态
    enum task_status status;
    // 线程的优先级
    uint8_t priority;
    // 线程函数名
    char name[16];
    // 用于PCB结构体的边界标记
    uint32_t stack_magic;
};
|
PCB的初始化也就是对上述结构体进行初始化
 1
 2
 3
 4
 5
 6
 7
 8
 9
10
11
12
13
14
15
|
/*初始化PCB*/
void init_thread(struct task_struct *pthread, char *name, int prio)
{
    memset(pthread, 0, sizeof(*pthread));
    strcpy(pthread->name, name);
    pthread->status = TASK_RUNNGING;
    pthread->priority = prio;
    /*
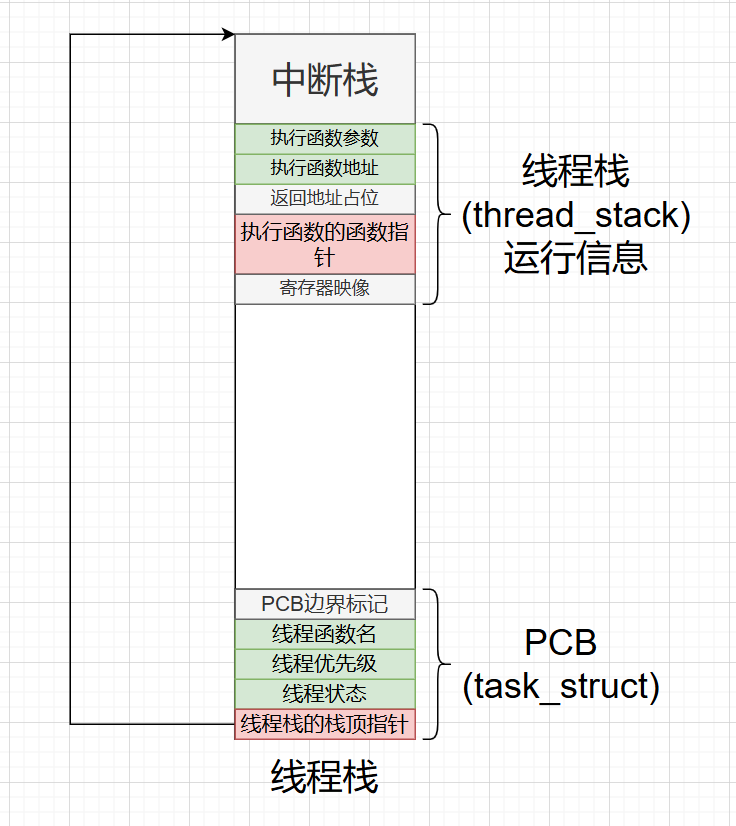
    一个线程的栈空间分配一页空间,将PCB放置在栈底
    pthread是申请的一页空间的起始地址,因此加上一页的大小,就是栈顶指针
    */
    pthread->self_kstack = (uint32_t *)((uint32_t)pthread + PG_SIZE);
    /*PCB的边界标记,防止栈顶指针覆盖掉PCB的内容*/
    pthread->stack_magic = 0x19991030;
}
|
以下是创建的线程栈内存示意图
初始化线程栈运行信息
 1
 2
 3
 4
 5
 6
 7
 8
 9
10
11
12
13
14
15
16
|
/*根据PCB信息,初始化线程栈的运行信息*/
void thread_create(struct task_struct *pthread, thread_func function, void *func_args)
{
    /*给线程栈空间的顶部预留出中断栈信息的空间*/
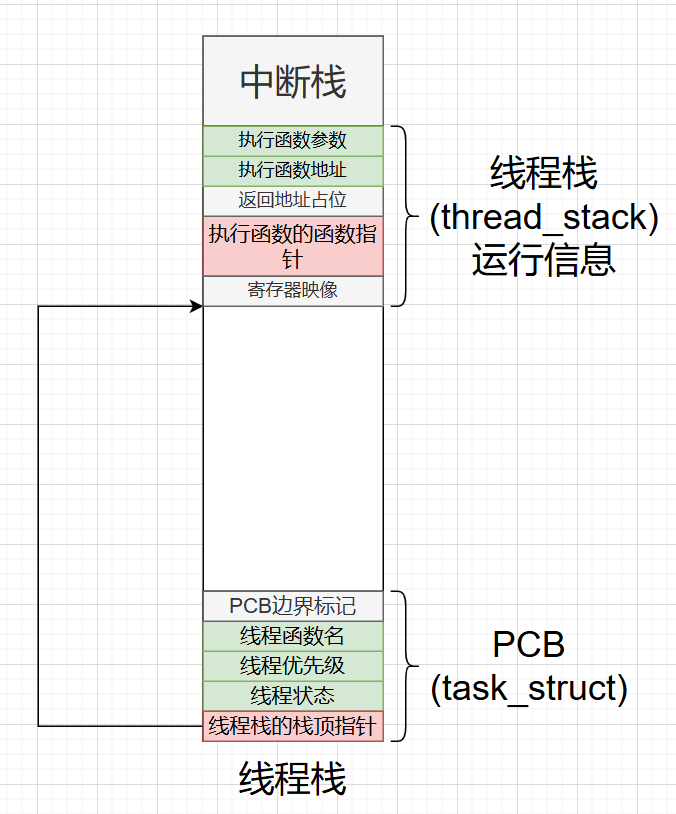
    pthread->self_kstack = (uint32_t *)((int)(pthread->self_kstack) - sizeof(struct intr_stack));
    /*给线程栈空间的顶部预留出线程栈信息的空间*/
    pthread->self_kstack = (uint32_t *)((int)(pthread->self_kstack) - sizeof(struct thread_stack));
    // 初始化线程栈,保存线程运行时需要的信息
    struct thread_stack *kthread_stack = (struct thread_stack *)pthread->self_kstack;

    // 线程执行函数
    kthread_stack->eip = kernel_thread;
    kthread_stack->function = function;
    kthread_stack->func_args = func_args;
    kthread_stack->ebp = kthread_stack->ebx = kthread_stack->edi = kthread_stack->esi = 0;
}
|
其中线程执行函数如下所示
1
2
3
4
|
static void kernel_thread(thread_func *function, void *func_args)
{
    function(func_args);
}
|
以下是初始化线程栈后的内存示意图
创建并运行线程
 1
 2
 3
 4
 5
 6
 7
 8
 9
10
|
    /*4.上述准备好线程运行时的栈信息后,即可运行执行函数了*/
    asm volatile("movl %0,%%esp;    \
                pop %%ebp;          \
                pop %%ebx;          \
                pop %%edi;          \
                pop %%esi;          \
                ret"
                 :
                 : "g"(thread->self_kstack)
                 : "memory");
|
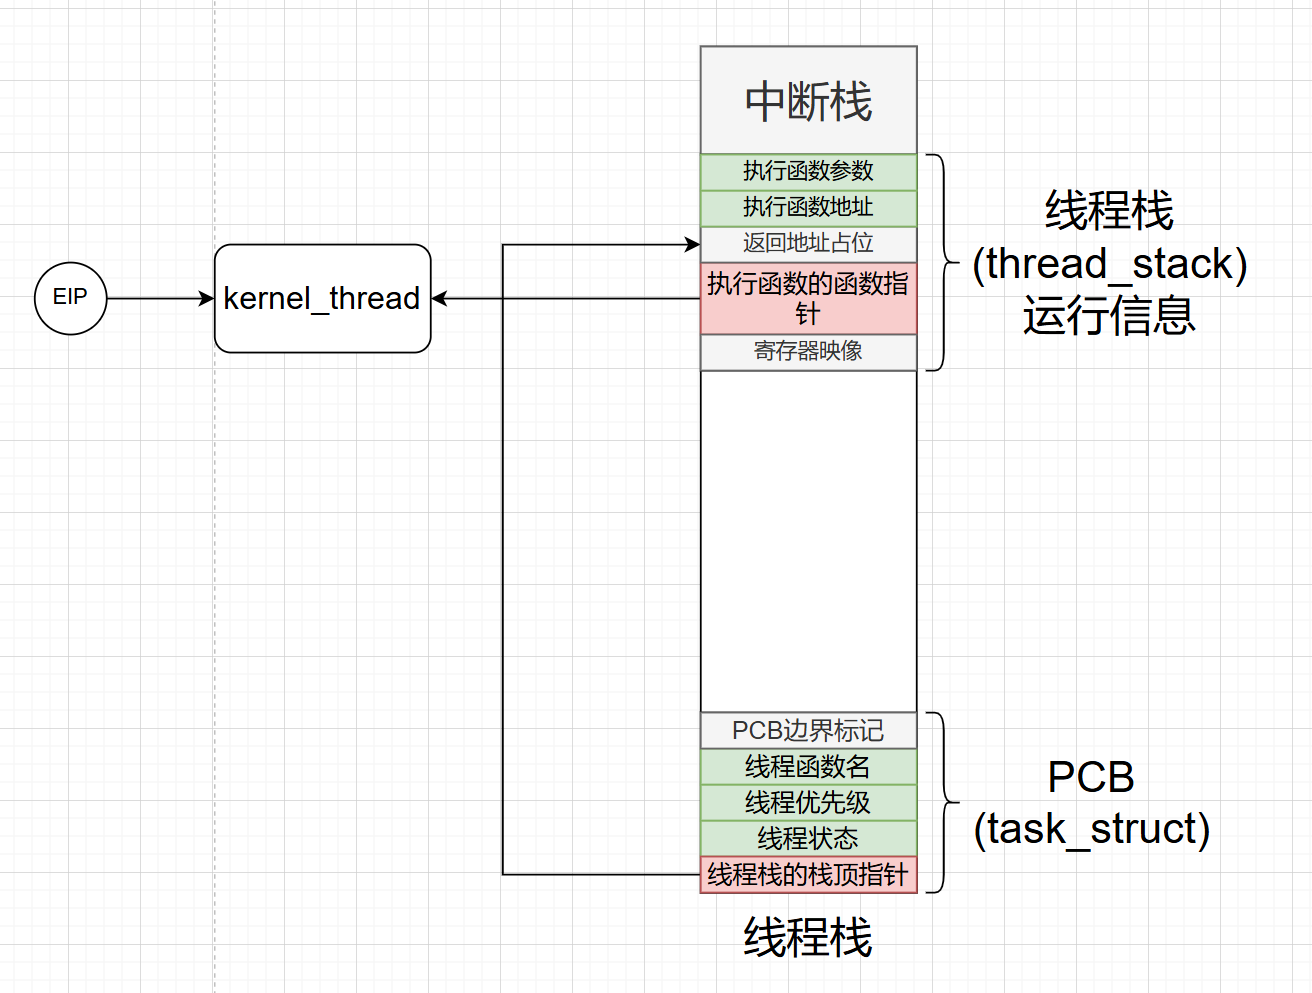
如下所示,当线程栈初始化结束之后,栈顶指针首先弹出了寄存器映像
1
2
3
4
|
                pop %%ebp;          \
                pop %%ebx;          \
                pop %%edi;          \
                pop %%esi;          \
|
这样栈顶指针就指向了通用执行函数kernel_thread,这样接下来只需要调用kernel_thread,就调用了用户的执行函数
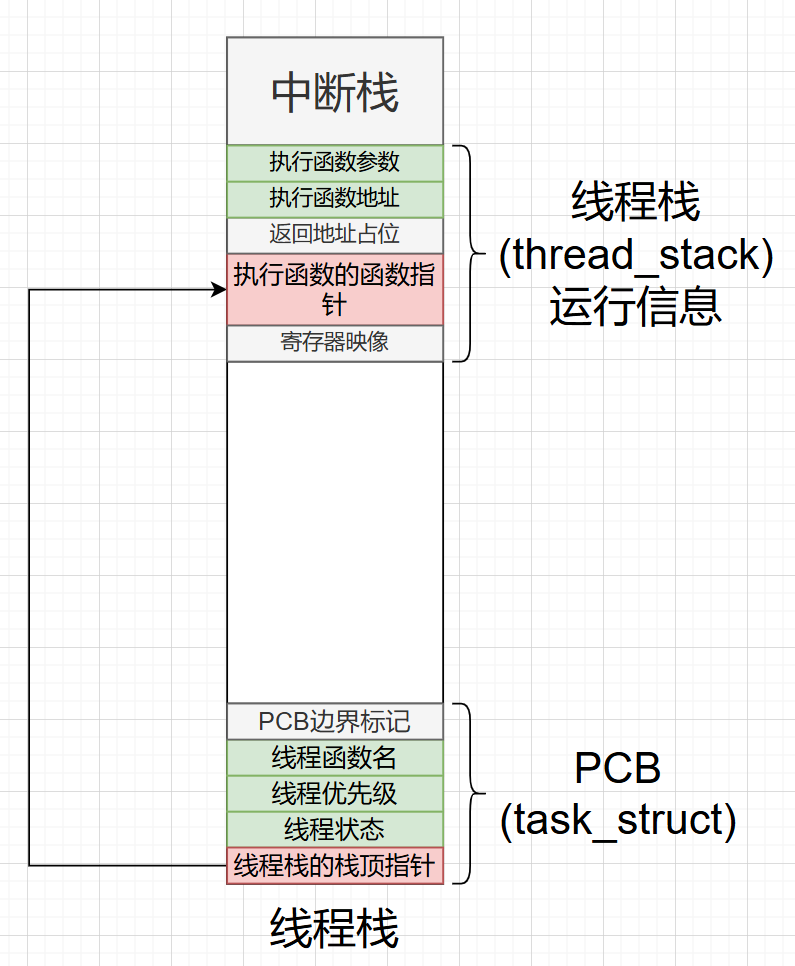
于是接下来代码执行ret指令,ret指令会做两件事
- 将当前栈顶指针的值弹出,然后赋值给指令寄存器EIP,这样就相当于调用了
kernel_thread
- 由于弹出了栈顶指针的值,因此栈顶指针会回退
最后的结果如下所示
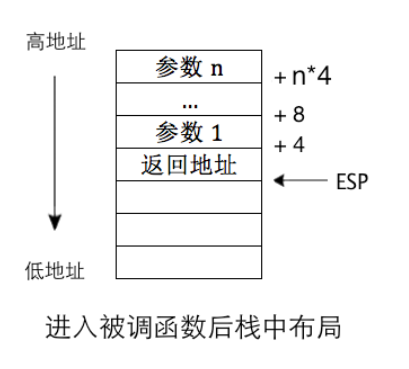
于是接下来,根据c语言的函数调用约定,kernel_thread会取出占位的返回地址上边的两个参数,也就是执行函数的地址与执行函数的参数,然后调用执行函数运行
完整代码
/thread/thread.h
 1
 2
 3
 4
 5
 6
 7
 8
 9
10
11
12
13
14
15
16
17
18
19
20
21
22
23
24
25
26
27
28
29
30
31
32
33
34
35
36
37
38
39
40
41
42
43
44
45
46
47
48
49
50
51
52
53
54
55
56
57
58
59
60
61
62
63
64
65
66
67
68
69
70
71
72
73
74
75
76
77
78
79
80
81
82
83
84
85
|
#ifndef __THREAD_THREAD_H
#define __THREAD_THREAD_H

#include "stdint.h"
/*定义执行函数*/
typedef void thread_func(void *);

/*定义进程或者线程的任务状态*/
enum task_status
{
    TASK_RUNNGING,
    TASK_READY,
    TASK_BLOCKED,
    TASK_WAITING,
    TASK_HANGING,
    TASK_DIED,
};

/*中断发生时调用中断处理程序的压栈情况*/
struct intr_stack
{
    uint32_t vec_no;
    // pushad的压栈情况
    uint32_t edi;
    uint32_t esi;
    uint32_t ebp;
    uint32_t esp_dummy;
    uint32_t ebx;
    uint32_t edx;
    uint32_t ecx;
    uint32_t eax;

    // 中断调用时处理器自动压栈的情况
    uint32_t gs;
    uint32_t fs;
    uint32_t es;
    uint32_t ds;
    uint32_t err_code;
    void (*eip)(void);
    uint32_t cs;
    uint32_t eflags;
    void *esp;
    uint32_t ss;
};

/*定义线程栈,存储线程执行时的运行信息*/
struct thread_stack
{
    uint32_t ebp;
    uint32_t ebx;
    uint32_t edi;
    uint32_t esi;

    // 一个函数指针,指向线程执行函数,目的是为了实现通用的线程函数调用
    void (*eip)(thread_func *func, void *func_args);
    // 以下三条是模仿call进入thread_start执行的栈内布局构建的,call进入就会压入参数与返回地址,因为我们是ret进入kernel_thread执行的
    // 要想让kernel_thread正常执行,就必须人为给它造返回地址,参数
    void(*unused_retaddr); // 一个栈结构占位
    thread_func *function;
    void *func_args;
};

/*PCB结构体*/
struct task_struct
{
    // 线程栈的栈顶指针
    uint32_t *self_kstack;
    // 线程状态
    enum task_status status;
    // 线程的优先级
    uint8_t priority;
    // 线程函数名
    char name[16];
    // 用于PCB结构体的边界标记
    uint32_t stack_magic;
};

/*初始化PCB*/
void init_thread(struct task_struct *pthread, char *name, int prio);
/*根据PCB信息,初始化线程栈的运行信息*/
void thread_create(struct task_struct *pthread, thread_func function, void *func_args);
/*根据线程栈的运行信息开始运行线程函数*/
struct task_struct *thread_start(char *name, int prio, thread_func function, void *func_args);

#endif
|
/thread/thread.c
 1
 2
 3
 4
 5
 6
 7
 8
 9
10
11
12
13
14
15
16
17
18
19
20
21
22
23
24
25
26
27
28
29
30
31
32
33
34
35
36
37
38
39
40
41
42
43
44
45
46
47
48
49
50
51
52
53
54
55
56
57
58
59
60
61
62
63
64
65
|
#include "thread.h"
#include "stdint.h"
#include "string.h"
#include "global.h"
#include "memory.h"

#define PG_SIZE 4096

static void kernel_thread(thread_func *function, void *func_args)
{
    function(func_args);
}

/*初始化PCB*/
void init_thread(struct task_struct *pthread, char *name, int prio)
{
    memset(pthread, 0, sizeof(*pthread));
    strcpy(pthread->name, name);
    pthread->status = TASK_RUNNGING;
    pthread->priority = prio;
    /*一个线程的栈空间分配一页空间,将PCB放置在栈底*/
    pthread->self_kstack = (uint32_t *)((uint32_t)pthread + PG_SIZE);
    pthread->stack_magic = 0x19991030;
}
/*根据PCB信息,初始化线程栈的运行信息*/
void thread_create(struct task_struct *pthread, thread_func function, void *func_args)
{
    /*给线程栈空间的顶部预留出中断栈信息的空间*/
    pthread->self_kstack = (uint32_t *)((int)(pthread->self_kstack) - sizeof(struct intr_stack));
    /*给线程栈空间的顶部预留出线程栈信息的空间*/
    pthread->self_kstack = (uint32_t *)((int)(pthread->self_kstack) - sizeof(struct thread_stack));
    // 初始化线程栈,保存线程运行时需要的信息
    struct thread_stack *kthread_stack = (struct thread_stack *)pthread->self_kstack;

    // 线程执行函数
    kthread_stack->eip = kernel_thread;
    kthread_stack->function = function;
    kthread_stack->func_args = func_args;
    kthread_stack->ebp = kthread_stack->ebx = kthread_stack->edi = kthread_stack->esi = 0;
}

/*根据线程栈的运行信息开始运行线程函数*/
struct task_struct *thread_start(char *name, int prio, thread_func function, void *func_args)
{
    /*1.分配一页的空间给线程作为线程执行的栈空间*/
    struct task_struct *thread = get_kernel_pages(1);
    /*2.初始化PCB,PCB里存放了线程的基本信息以及线程栈的栈顶指针*/
    init_thread(thread, name, prio);
    /*
    3.根据线程栈的栈顶指针,初始化线程栈,也就是初始化线程的运行信息
    比如线程要执行的函数,以及函数参数
    */
    thread_create(thread, function, func_args);
    /*4.上述准备好线程运行时的栈信息后,即可运行执行函数了*/
    asm volatile("movl %0,%%esp;    \
                pop %%ebp;          \
                pop %%ebx;          \
                pop %%edi;          \
                pop %%esi;          \
                ret"
                 :
                 : "g"(thread->self_kstack)
                 : "memory");
    return thread;
}
|
编译运行
 1
 2
 3
 4
 5
 6
 7
 8
 9
10
11
12
13
14
15
16
17
18
19
20
21
22
23
24
25
26
27
28
29
30
31
32
33
34
35
36
37
38
|
mkdir -p bin
#编译mbr
nasm -o $(pwd)/bin/mbr -I $(pwd)/boot/include/ $(pwd)/boot/mbr.S
dd if=$(pwd)/bin/mbr of=~/bochs/hd60M.img bs=512 count=1 conv=notrunc

#编译loader
nasm -o $(pwd)/bin/loader -I $(pwd)/boot/include/ $(pwd)/boot/loader.S
dd if=$(pwd)/bin/loader of=~/bochs/hd60M.img bs=512 count=4 seek=2 conv=notrunc

#编译print函数
nasm -f elf32 -o $(pwd)/bin/print.o $(pwd)/lib/kernel/print.S
# 编译kernel
nasm -f elf32 -o $(pwd)/bin/kernel.o $(pwd)/kernel/kernel.S

#编译main文件
gcc-4.4 -o $(pwd)/bin/main.o -c -fno-builtin -m32 -I $(pwd)/lib/kernel/ -I $(pwd)/lib/ -I $(pwd)/kernel/ -I $(pwd)/thread/ $(pwd)/kernel/main.c
#编译interrupt文件
gcc-4.4 -o $(pwd)/bin/interrupt.o -c -fno-builtin -m32 -I $(pwd)/lib/kernel/ -I $(pwd)/lib/ -I $(pwd)/kernel/ $(pwd)/kernel/interrupt.c
#编译init文件
gcc-4.4 -o $(pwd)/bin/init.o -c -fno-builtin -m32 -I $(pwd)/lib/kernel/ -I $(pwd)/lib/ -I $(pwd)/kernel/ $(pwd)/kernel/init.c
# 编译debug文件
gcc-4.4 -o $(pwd)/bin/debug.o -c -fno-builtin -m32 -I $(pwd)/lib/kernel/ -I $(pwd)/lib/ -I $(pwd)/kernel/ $(pwd)/kernel/debug.c
# 编译string文件
gcc-4.4 -o $(pwd)/bin/string.o -c -fno-builtin -m32 -I $(pwd)/lib/kernel/ -I $(pwd)/lib/ -I $(pwd)/kernel/ $(pwd)/lib/string.c
# 编译bitmap文件
gcc-4.4 -o $(pwd)/bin/bitmap.o -c -fno-builtin -m32 -I $(pwd)/lib/kernel/ -I $(pwd)/lib/ -I $(pwd)/kernel/ $(pwd)/lib/kernel/bitmap.c
# 编译memory文件
gcc-4.4 -o $(pwd)/bin/memory.o -c -fno-builtin -m32 -I $(pwd)/lib/kernel/ -I $(pwd)/lib/ -I $(pwd)/kernel/ $(pwd)/kernel/memory.c
# 编译thread文件
gcc-4.4 -o $(pwd)/bin/thread.o -c -fno-builtin -m32 -I $(pwd)/lib/kernel/ -I $(pwd)/lib/ -I $(pwd)/kernel/ -I $(pwd)/thread/ $(pwd)/thread/thread.c

#将main函数与print函数进行链接
ld -m elf_i386 -Ttext 0xc0001500 -e main -o $(pwd)/bin/kernel.bin $(pwd)/bin/main.o $(pwd)/bin/thread.o  $(pwd)/bin/print.o $(pwd)/bin/init.o $(pwd)/bin/interrupt.o $(pwd)/bin/kernel.o $(pwd)/bin/memory.o $(pwd)/bin/bitmap.o $(pwd)/bin/string.o $(pwd)/bin/debug.o

#将内核文件写入磁盘,loader程序会将其加载到内存运行
dd if=$(pwd)/bin/kernel.bin of=~/bochs/hd60M.img bs=512 count=200 conv=notrunc seek=9

#rm -rf bin/*
|
运行结果如下所示
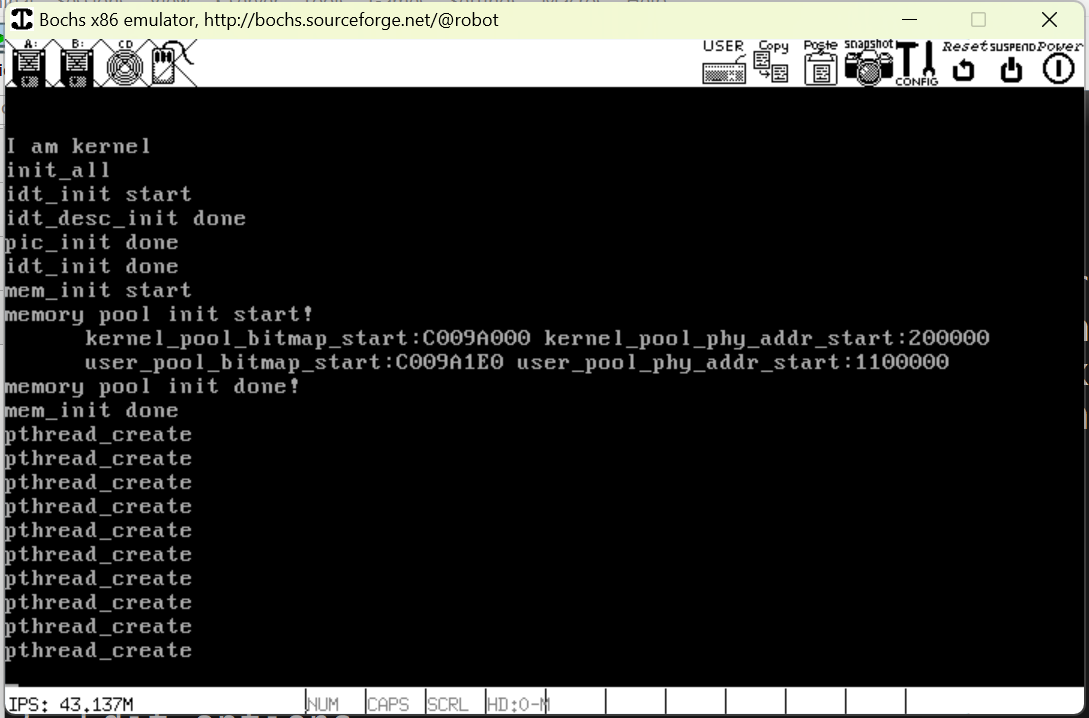
可以看到,最后如期打印了执行函数中的信息


